

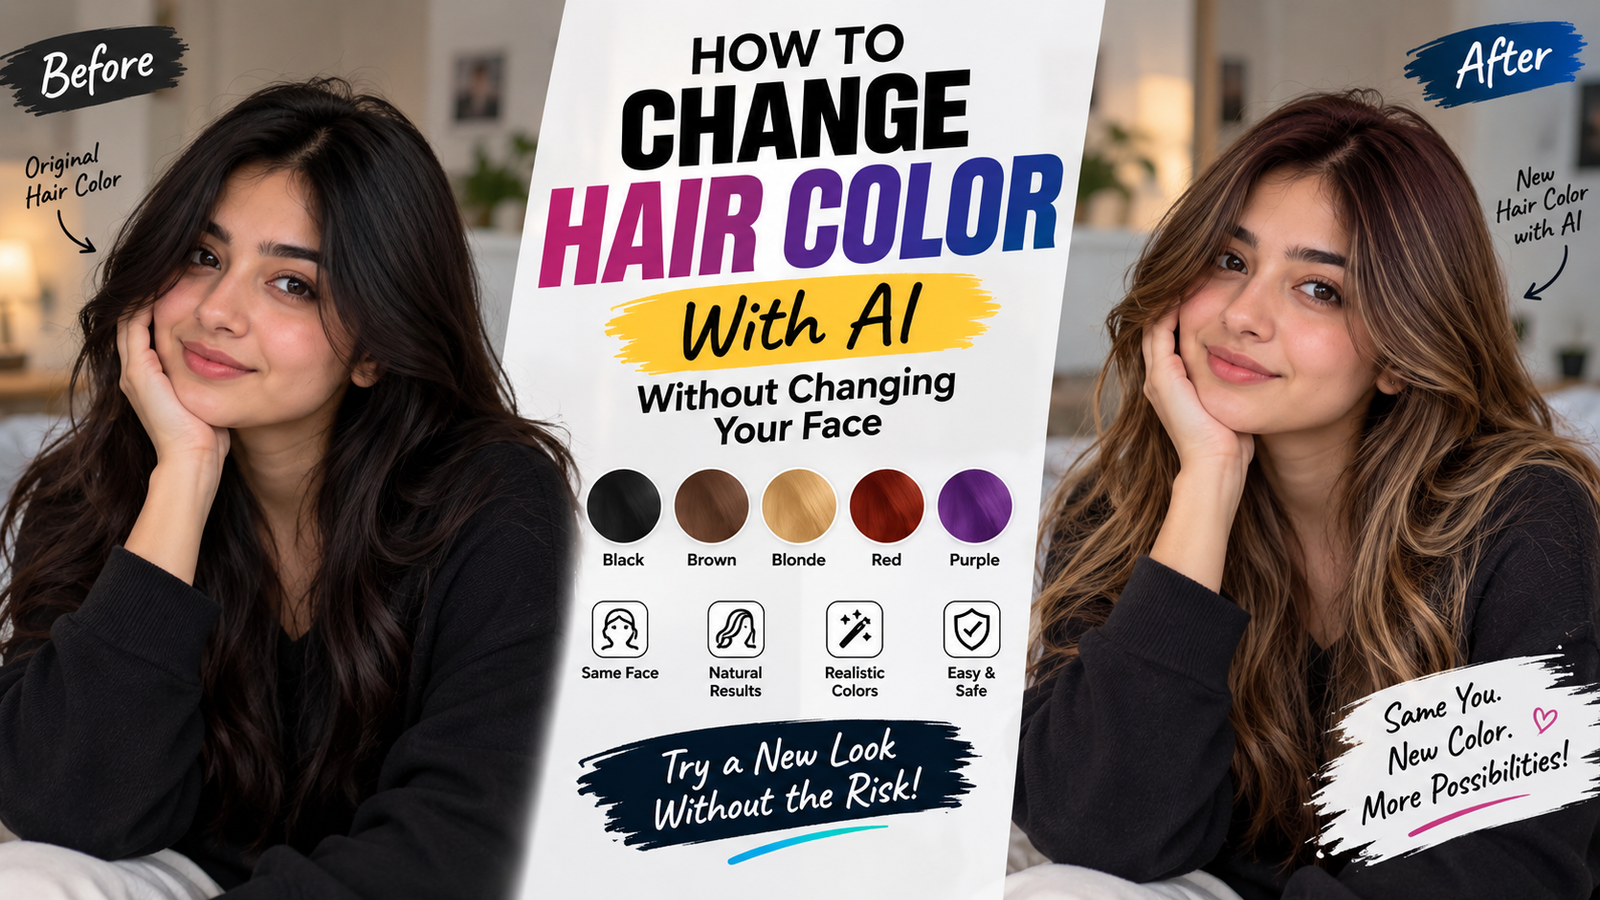
Changing hair color is one of those photo edits that looks easy until you actually try it. A simple request like “make my hair black” can sometimes change much more than the hair itself. The face may become slightly different, the skin tone can shift, and individual strands can turn into an unrealistic block of color.
That is why change hair color with AI should be treated as a selective editing task rather than a complete image transformation.
The aim is simple: change the hair color while keeping the person’s face, hairstyle, hair texture, lighting, expression, and overall identity intact.
This guide explains how to get that kind of result, what to include in an AI editing instruction, and what to do when the generated hair starts looking artificial.
Why AI Sometimes Changes the Face When Editing Hair
The biggest problem with AI hair-color editing isn’t usually the color itself.
It’s selection.
Hair is not a solid shape. Individual strands overlap the forehead, ears, neck, and sometimes the face. Curly or messy hair can be even harder to separate from the background.
When an AI editor tries to understand the hair, it may also reinterpret nearby areas.
That’s when you might notice things like:
- A slightly different jawline
- Changed eyebrows
- Different skin texture
- Altered eyes
- A new-looking hairstyle
- Hair that no longer matches the original shape
None of these changes were part of the request, but they can happen when the editing instruction is too broad.
A better approach is to make it very clear that the hair is the only area being changed.
Start With the Original Hair, Not a New Hairstyle
If your goal is simply to experiment with color, don’t ask the AI to redesign the hair at the same time.
For example, changing brown hair to dark black is one task.
Changing brown hair to black, adding curls, increasing volume, changing the haircut, and adding highlights is several different tasks combined together.
The more changes you request at once, the harder it becomes to tell whether the AI preserved the original person.
For a realistic result, start with:
Change only the existing hair color while preserving the original hairstyle, hair length, hair texture, face, expression, skin tone, and composition.
Once that works, you can make another edit if you actually want to change the hairstyle.
The Best Hair Color Is the One That Matches the Existing Lighting
This is something people often overlook.
Hair color doesn’t exist independently from light.
A person’s hair can look:
- Warmer in sunset light
- Cooler under fluorescent lighting
- Brighter near a window
- Almost black in deep shadow
- Slightly golden under warm indoor lights
If you ask AI for a perfectly flat hair color, the result can look painted on.
Imagine a portrait taken during golden hour. The original hair has warm highlights along one side.
If you change the hair to black but tell the AI to make every strand the exact same black, those natural highlights disappear.
The result may technically be black hair, but it doesn’t look like a photograph anymore.
A better instruction preserves the existing relationship between light and hair.
How to Keep Hair Texture Natural
Hair texture is one of the easiest things to lose during AI editing.
Real hair contains thousands of tiny variations. Even straight hair has individual strands, flyaways, shadows, and highlights.
After an aggressive AI edit, hair can sometimes look like:
- Plastic
- Painted strokes
- A solid dark shape
- Artificially glossy strands
- Blurry edges
This usually happens because the AI prioritizes the requested color over the original texture.
When changing hair color, make texture preservation part of the instruction.
Tell the editor to maintain:
- Individual strands
- Existing hairstyle
- Natural volume
- Flyaway hairs
- Original hairline
- Existing highlights and shadows
You don’t need to describe every strand. The important thing is to tell the AI that you’re changing color, not hair structure.
Dark Hair Colors Need Special Attention
Black and very dark brown are surprisingly difficult.
If the AI makes every part of the hair pure black, there may be no visible texture left.
Real black hair usually contains subtle variations caused by light.
You may see:
- Dark brown highlights
- Soft gray reflections
- Warm tones
- Cool shadows
- Slightly lighter strands
That’s what gives black hair dimension.
So instead of requesting “solid black hair,” a more realistic goal is natural deep black with the original highlights and texture preserved.
The same principle applies to dark blue, burgundy, deep purple, and other darker colors.
Light Hair Colors Can Affect the Whole Photograph
Going in the opposite direction can create another problem.
Suppose someone has dark brown hair and you want to make it blonde.
AI has to create lighter areas that weren’t present in the original image.
If the original hair is heavily shadowed, simply changing its color may not be enough.
The AI may brighten the surrounding face or background as well.
This is where you should watch the skin tone carefully.
If the forehead suddenly becomes brighter because the hair was changed, the edit has gone beyond the requested area.
The solution isn’t necessarily to make the hair darker.
The better solution is to tell the AI to keep the original facial lighting unchanged while adjusting only the hair.
What Happens When You Change Hair Color in a Portrait?
Portraits require more care than casual photographs because the viewer naturally focuses on the face.
Even a tiny change can become noticeable.
When editing a portrait, compare the original and edited image specifically around:
Hairline
Check whether the hairline moved.
Forehead
Make sure the AI didn’t accidentally recolor skin near the hair.
Eyebrows
AI can sometimes interpret eyebrows as part of the hair region.
Ears
Look for unnatural color bleeding around the ears.
Neck
Long hair can overlap the neck, making the boundary difficult to edit.
Facial features
Compare the eyes, nose, lips, and jawline with the original.
The goal is for someone looking at the image to think:
“The hair color is different.”
Not:
“The entire portrait has been regenerated.”
Changing Hair Color in Full-Body Photos
Full-body photographs can be easier in some ways because the face occupies a smaller portion of the image.
But hair may be less detailed because the camera is farther away.
In that situation, AI might have less texture information to work with.
For example, if the person is standing several meters away, individual strands may already be too small to see.
Don’t expect the AI to recreate highly detailed strands that weren’t visible in the original.
Instead, focus on maintaining the existing silhouette and overall texture.
Hair Color Changes in Outdoor Photos
Outdoor lighting makes hair editing more interesting.
Natural light can create strong highlights, backlighting, and color casts.
A person photographed against the sun might have bright edges around the hair.
If you change the hair color but remove those bright edges, the subject can suddenly look cut out from the background.
The AI should preserve the existing light direction.
If sunlight is coming from the right, the brighter hair edge should still make sense on the right after the color change.
This is one of the small details that separates a convincing edit from an obviously generated one.
What About Curly or Wavy Hair?
Curly hair is harder because the boundary between hair and background is less predictable.
There may be:
- Loose curls
- Flyaway strands
- Small gaps
- Overlapping curls
- Hair crossing the forehead
- Hair crossing the shoulders
A broad instruction such as “change the hair to red” may cause the AI to fill these gaps incorrectly.
For curly hair, preservation instructions are particularly useful.
Ask the editor to retain the existing curl pattern, length, volume, and silhouette while changing only the color.
Don’t ask it to “make the curls more defined” unless that is actually what you want.
Don’t Change Hair Color and Haircut at the Same Time
This is probably the easiest way to keep your edit under control.
If you want to see whether a new hair color suits you, change only the color first.
Once you’re happy with it, you can experiment with:
- Length
- Bangs
- Layers
- Volume
- Parting
- Curls
- Straightening
This staged approach makes it much easier to spot mistakes.
It also gives you a better chance of preserving the person’s original appearance.
How to Change Highlights Without Recoloring All the Hair
Sometimes you don’t want a completely new hair color.
You may only want:
- Subtle caramel highlights
- Ash-blonde highlights
- Copper strands
- Warm brown highlights
- Face-framing highlights
- A few lighter sections
These edits require even more precision.
Instead of asking AI to recolor the whole head, specify that the base hair color should remain unchanged and only selected strands or sections should receive the new tone.
The result should look like light naturally interacting with the hair rather than colored stripes being placed on top.
Balayage and Ombre Need a Natural Transition
Gradient hair colors are particularly useful for AI editing because they require a gradual transition.
The problem is that AI can sometimes create an obvious dividing line between two colors.
Real balayage and ombre usually have variation.
The transition isn’t perfectly identical across every strand.
If you want a natural result, focus on:
- Gradual color transition
- Existing strand direction
- Natural highlights
- Original hair texture
- Uneven but believable color distribution
Avoid making the transition too geometrically perfect.
Perfect symmetry can actually make an AI edit look less realistic.
What If the AI Changes the Hairstyle?
This is a common side effect.
You asked for a color change, but the final image has:
- More volume
- Shorter hair
- Different curls
- Different parting
- Smoother hair
- Different bangs
If this happens, the instruction needs a stronger preservation boundary.
Use language that clearly says the existing hairstyle must remain unchanged.
Also avoid describing the hairstyle again unless necessary.
Sometimes giving the AI too many stylistic details encourages it to recreate the hair rather than simply recolor it.
Fixing Color Bleeding Around the Hair
Color bleeding happens when the new hair color appears outside the actual hair area.
You might notice a reddish tint on:
- Forehead
- Ears
- Neck
- Clothing
- Background
This is a selection problem.
If your editing tool supports a brush, mask, or selection feature, use it around the hair rather than editing the entire image.
If you’re using a text-based AI editor, specify the affected region clearly and tell it to preserve the surrounding skin, clothing, and background colors.
Small boundaries matter.
How to Keep Skin Tone Unchanged
Hair color and skin tone can influence each other visually.
For example, bright copper hair can make skin appear warmer.
That doesn’t mean the AI should actually change the skin.
This distinction is important.
If the requested edit is hair color, the original skin tone should remain intact.
After editing, compare the:
- Forehead
- Cheeks
- Nose
- Neck
- Hands
against the original.
If the entire person has become warmer or cooler, the AI probably changed the image’s overall color grading instead of limiting the edit to the hair.
For a broader discussion of maintaining natural results during AI editing, see our guide on how to make AI-edited photos look realistic.
A Better Way to Write the Editing Instruction
You don’t need a complicated paragraph every time.
A useful structure is:
Target → New color → Preservation → Lighting → Restrictions
For example:
Change the existing hair color to a natural dark auburn. Keep the original hairstyle, length, texture, hairline, face, facial features, expression, skin tone, clothing, background, and composition unchanged. Preserve the original lighting direction and natural highlights. Do not alter any part of the face or surrounding image.
Notice that the instruction isn’t asking AI to “create beautiful auburn hair.”
It’s asking for a very specific correction.
That’s intentional.
When realism matters, fewer unnecessary instructions usually produce a more controlled edit.
Why Reference Images Can Cause Problems
Sometimes people upload a second image showing the hair color they want.
That’s useful, but it can also create confusion.
If the reference image shows:
- Different hairstyle
- Different hair length
- Different lighting
- Different face
- Different camera angle
the AI may copy more than just the color.
If you use a reference image, make the purpose clear:
Use the reference only for the desired hair color. Do not copy the hairstyle, facial features, pose, lighting, or person.
This helps separate the visual reference from the actual subject.
Test the Color Before Making a Major Change
If you’re unsure whether a color will work, start with a subtle version.
For example, instead of jumping from dark brown to bright copper, try a warm medium brown first.
This gives you a better idea of how the color interacts with the existing lighting and skin tone.
You can then move toward the final color.
This approach is also useful when creating social-media content. You don’t necessarily need the most dramatic transformation to make an image interesting.
A believable change often looks better than an extreme one.
Using AI Hair Color Edits for Social Media
Hair-color experiments are naturally suited to social media because the transformation is easy to understand visually.
You can create:
- Before-and-after posts
- Hair-color comparisons
- Style experiments
- Beauty content
- Reels thumbnails
- Profile-photo variations
But don’t over-edit the portrait just because it’s intended for social media.
Heavy smoothing, face reshaping, dramatic color grading, and hair replacement all at once can make the result look artificial.
If the purpose is to show a hair-color idea, let the hair color be the main change.
When AI Hair Color Editing Isn’t a Good Idea
AI editing isn’t perfect for every photograph.
You may get poor results when:
- Hair is extremely blurry
- The subject is very small
- Hair is heavily covered by another object
- The original photograph has very low resolution
- Hair blends into a similarly colored background
- Strong shadows completely hide the hair
- The image contains heavy compression artifacts
In these cases, the AI has less reliable information to work from.
A better source photograph can sometimes make a bigger difference than a more complicated prompt.
A Simple Before-and-After Review
Don’t look at the edited image by itself.
Keep the original open beside it.
First check the obvious difference:
Did the hair color change?
Then check everything that wasn’t supposed to change:
Is the face the same?
Is the skin tone the same?
Is the hairstyle the same?
Is the background the same?
Is the lighting still believable?
Finally, zoom in around the hairline.
That’s where small AI mistakes tend to become visible.
If everything looks natural at 100% zoom, the edit is much more likely to hold up when the image is uploaded to social media.
The Real Goal of AI Hair Color Editing
It’s tempting to judge an AI edit by how dramatic the transformation looks.
That’s the wrong benchmark.
A good hair-color edit should make the viewer notice the new color, not the editing process.
The best result may look almost boring from a technical point of view.
The face hasn’t changed.
The background hasn’t changed.
The hairstyle hasn’t changed.
The lighting still makes sense.
Only the hair color is different.
That’s exactly what you want.
Final Thoughts
Change hair color with AI when you want to experiment with a new look without committing to a completely different portrait.
The trick is to keep the edit narrow. Change the color, but preserve the existing hairstyle, texture, lighting, face, and skin tone. If the AI starts modifying those areas, reduce the scope of the edit rather than adding more and more effects.
And don’t forget to compare the final image with the original.
AI can produce a very convincing hair color in seconds, but a convincing image isn’t necessarily an accurate edit. The more carefully you protect the original photograph, the more natural the final result will feel.
For anyone building a consistent set of edited portraits, this same principle applies beyond hair color: make the intended change obvious and every unintended change difficult.






