

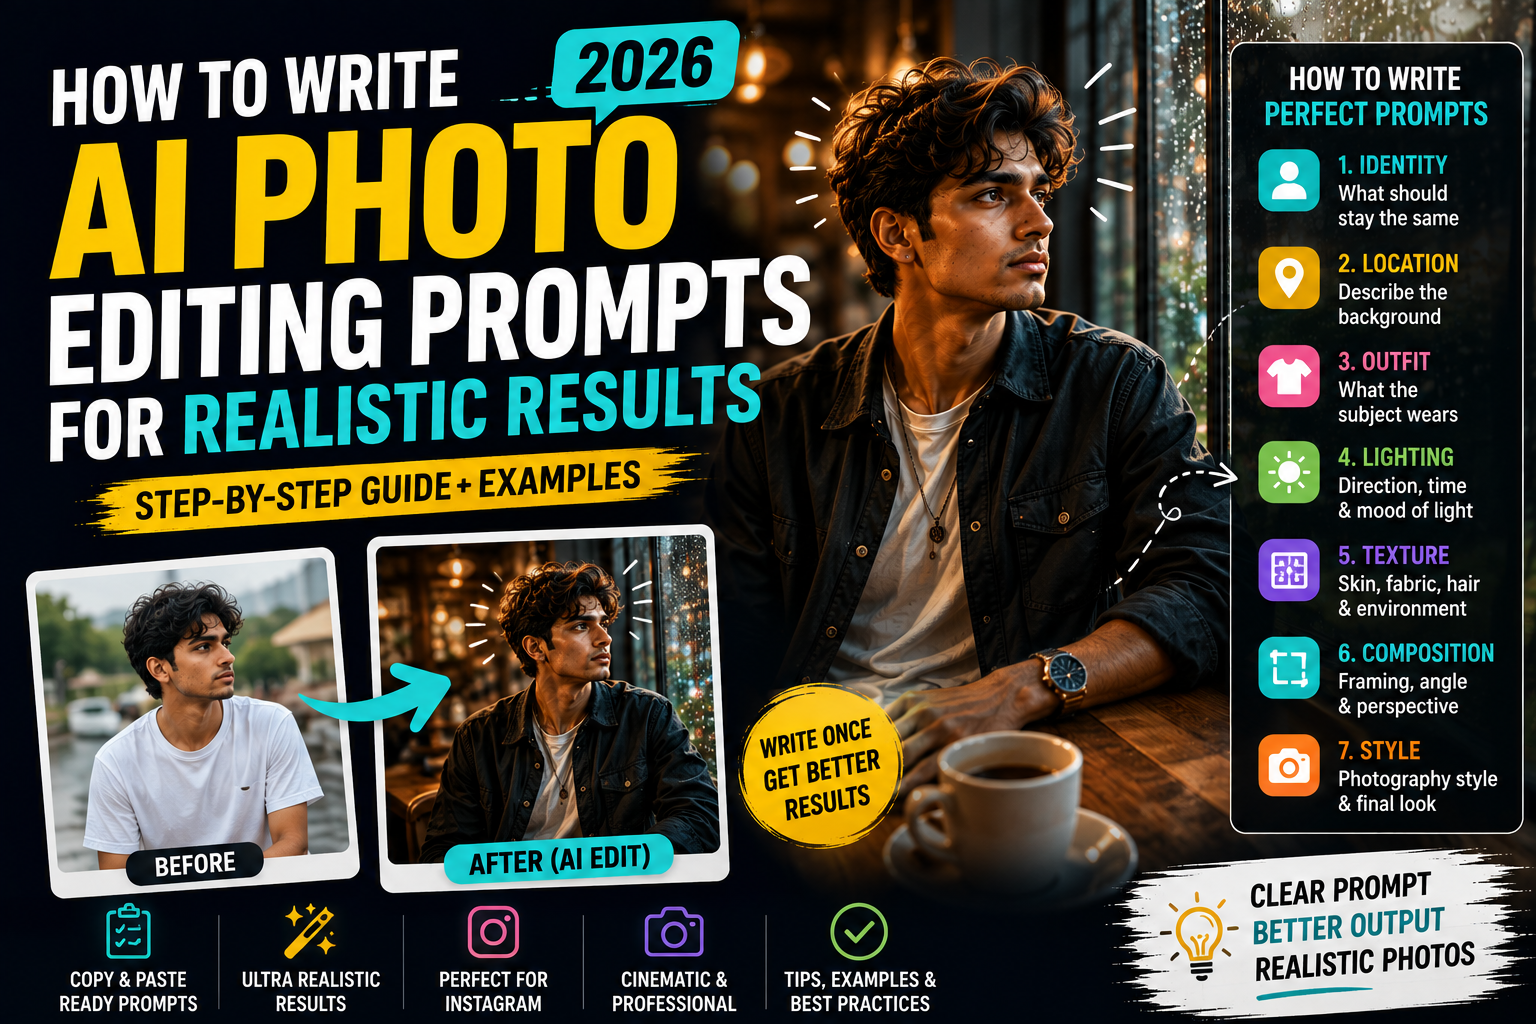
AI can transform an ordinary photo into something that looks like it came from a professional photoshoot. But there is a major difference between typing a random sentence and writing an AI photo editing prompt that clearly tells the AI what you actually want.
You may have experienced this yourself: you upload a good photo, enter a prompt, and the result looks strange. Your face changes, skin becomes too smooth, hands look unnatural, clothes lose their texture, or the background doesn’t match the lighting on your face.
In many cases, the problem isn’t simply the AI tool. The instructions can be part of the problem.
A good prompt explains what should remain unchanged, what should be edited, how the scene should be lit, and what kind of photograph you want as the final result.
In this guide, you’ll learn how to write AI photo editing prompts for realistic portraits, Instagram photos, cinematic edits, professional pictures, and everyday photography.
More importantly, you’ll learn why certain prompts work better than others.
What Is an AI Photo Editing Prompt?
An AI photo editing prompt is a written instruction that tells an AI image tool how you want an existing photograph to be changed.
For example, a very basic prompt might say:
Make my photo cinematic.
The problem is that “cinematic” can mean many different things.
Should the photo be dark or bright? Should it be photographed at night or during sunset? What should happen to the background? Should the person’s clothing change? Where should the light come from?
A more useful instruction would be:
Preserve the person’s original facial identity and natural proportions. Place the subject beside a rain-covered cafe window during evening, with warm indoor light illuminating one side of the face, cool ambient light outside, realistic glass reflections, natural skin texture, subtle film grain, and cinematic photography.
Now the AI has a much clearer visual direction.
How to Write AI Photo Editing Prompts Step by Step
You don’t need to be a professional photographer or prompt engineer to write useful prompts.
A simple structure can make the process much easier.
Step 1: Tell AI What Should Stay the Same
When you’re editing an existing photo, start by identifying what you don’t want changed.
For a portrait, this might include:
- Facial identity
- Facial structure
- Hairstyle
- Skin tone
- Expression
- Body proportions
For example:
Preserve the person’s original facial identity, facial structure, hairstyle, skin tone, expression, and natural body proportions.
This is particularly useful when your goal is to change the environment or clothing without intentionally redesigning the person’s appearance.
However, identity preservation still depends on the image model and source photo. A prompt can communicate your intention, but it cannot guarantee pixel-perfect consistency.
Step 2: Describe the Location Clearly
“Beautiful background” isn’t a useful description.
Instead, describe an actual environment.
For example:
Weak description:
Put me in a cool place.
Better description:
Place the person inside a quiet independent bookstore with tall wooden shelves, warm reading lamps, and soft afternoon sunlight entering through a side window.
The second version tells the AI what objects, materials, and lighting belong in the environment.
You can use locations such as a bookstore, metro station, flower market, cafe, railway platform, studio, garden, old street, beach, library, rooftop, office, museum, or workshop.
The location should support the overall mood you’re trying to create.
Step 3: Describe the Outfit
If you want the clothing changed, be specific without overloading the prompt.
Instead of:
Give him stylish clothes.
Try:
Dress the subject in a textured olive overshirt layered over a plain cream T-shirt with relaxed dark trousers.
Or for a traditional portrait:
Dress the subject in an earthy handloom-style saree with a subtle woven texture and minimal traditional jewelry.
Mentioning materials such as cotton, denim, linen, wool, or handwoven fabric can also help communicate texture.
Step 4: Choose the Right Lighting
Lighting is one of the most important parts of realistic photography.
A beautiful background won’t look believable if the subject and environment appear to be illuminated by completely different light sources.
Instead of writing:
Add professional lighting.
Describe the actual light.
For example:
Use soft morning sunlight entering from the left side of the frame, creating gentle facial shadows and natural highlights.
Other useful lighting descriptions include:
Soft window light: Useful for natural portraits.
Overcast daylight: Creates soft, even shadows.
Golden-hour light: Produces warm directional illumination.
Blue-hour light: Useful for atmospheric evening scenes.
Direct camera flash: Works well for retro snapshot aesthetics.
Soft studio lighting: Useful for professional headshots.
The key is consistency.
If your scene takes place at midnight, bright afternoon sunlight obviously wouldn’t make sense.
Step 5: Add Realistic Textures
One reason some AI portraits look artificial is that everything becomes too smooth.
Real skin isn’t perfectly smooth. Neither are clothes, walls, wood, glass, or streets.
You can ask for details such as:
Natural skin texture, individual hair strands, realistic cotton fabric, subtle facial details, accurate glass reflections, believable wall texture, and natural shadows.
Don’t add every texture-related keyword to every prompt.
Describe only the materials actually present in the scene.
Step 6: Choose Your Composition
Composition tells the AI how the photograph should be framed.
Common options include:
Close-up: Mainly face and shoulders.
Head-and-shoulders: Useful for profile pictures.
Waist-up portrait: Good for fashion and lifestyle photography.
Full-body portrait: Useful when clothing and environment are important.
Environmental portrait: Shows both the person and their surroundings.
Candid composition: Makes the image feel less posed.
For example:
Use a waist-up composition with the subject positioned slightly off-center and enough environmental detail to show the cafe setting.
That’s much more specific than simply requesting a “professional photo.”
Step 7: Choose a Photography Style
Photography style gives your prompt a final creative direction.
You might choose:
- Editorial photography
- Lifestyle photography
- Documentary photography
- Cinematic photography
- Travel photography
- Studio portrait photography
- Analog film photography
- Street photography
- Fashion photography
Try not to combine five unrelated styles in one prompt.
“Documentary cinematic luxury vintage fashion photography” doesn’t necessarily make the image better.
Choose the style that best matches the scene.
A Simple AI Photo Editing Prompt Formula
You can remember the following structure:
Identity + Location + Outfit + Lighting + Texture + Composition + Photography Style
Here’s how that formula looks in practice.
Preserve the person’s original facial identity, hairstyle, skin tone, and natural proportions. Place the subject inside a quiet bookstore beside a tall window. Dress them in a textured brown overshirt over a cream T-shirt. Use warm afternoon window light from one side with realistic facial shadows. Maintain natural skin texture, detailed hair, realistic fabric, and believable wood textures. Use a waist-up composition with subtle background depth and editorial lifestyle photography.
You don’t have to follow this exact order every time.
The formula is simply a checklist to make sure you’ve described the important parts.
Bad AI Prompt vs Good AI Prompt
Understanding the difference is easier with examples.
Example 1: Instagram Portrait
Bad Prompt:
Make my photo viral and stylish in 8K.
Better Prompt:
Preserve the person’s facial identity and natural proportions. Create a candid Instagram portrait outside a small cafe during early morning. Add relaxed neutral clothing, warm sunlight, realistic storefront reflections, natural skin texture, detailed hair, soft environmental shadows, and lifestyle photography.
Notice that the improved prompt doesn’t promise virality.
Instead, it describes an actual photograph.
Example 2: Cinematic Portrait
Bad Prompt:
Make cinematic Hollywood photo ultra HD.
Better Prompt:
Preserve facial identity and natural skin texture. Place the subject beside a rain-covered window during evening. Use warm interior light from one side and cool ambient light outside. Add realistic raindrops, subtle glass reflections, detailed clothing, restrained colors, gentle film grain, and cinematic portrait photography.
Example 3: Professional Profile Photo
Bad Prompt:
Make professional DP.
Better Prompt:
Create a clean head-and-shoulders professional portrait while preserving facial identity, hairstyle, skin tone, and natural expression. Use a softly textured warm-grey background, balanced soft lighting, realistic skin texture, sharp eyes, subtle shadows, and centered framing suitable for a profile picture.
How to Write AI Prompts for Realistic Faces
The face is usually the most important part of a portrait.
When you want the edited image to remain recognizable, use clear preservation instructions.
For example:
Preserve the original facial identity, facial structure, hairstyle, skin tone, eye color, expression, and natural facial proportions.
You can then describe the desired photographic treatment:
Maintain realistic skin texture, subtle pores, individual hair strands, natural eye reflections, gentle tonal variation, and believable highlights and shadows.
Avoid instructions such as “perfect flawless glass skin” if realism is your goal.
Real skin has texture.
How to Write AI Photo Editing Prompts for Instagram
When creating images for Instagram, think about how the photo will actually be displayed.
A feed post can include more environmental detail because the image occupies a larger area.
A profile picture is different. Instagram displays it at a small size and crops it into a circle.
For an Instagram profile image, try:
Create a centered head-and-shoulders portrait with enough space around the head for circular cropping. Keep the face sharp and prominent, use a simple background, natural skin texture, and balanced portrait lighting.
For a Reel cover, you can add:
Use a vertical 9:16 composition, keep the main subject clearly visible near the center, and leave uncluttered space near the upper area for optional title text.
It’s often easier to add the final text afterward in a design editor.
How to Write Cinematic AI Photo Editing Prompts
“Cinematic” doesn’t automatically mean dark shadows and neon lights.
Think about a movie scene.
Where is the light coming from? What is happening in the background? What time of day is it? What emotion should the scene communicate?
Here’s an example:
Place the subject at a quiet railway platform during blue hour. Preserve facial identity and natural proportions. Add a stationary train in the distance, soft overhead station lights, a deep-blue evening sky, realistic platform textures, subtle atmospheric haze, natural skin tones, and restrained cinematic color grading.
The scene feels cinematic because it has atmosphere and visual storytelling—not because the word “cinematic” appears ten times.
How to Write AI Prompts for Boys
A realistic male portrait doesn’t need a Lamborghini, motorcycle, sunglasses, black shirt, and neon city in every image.
Try everyday environments.
For example:
Preserve the person’s original facial identity and hairstyle. Place him inside a small record shop during late afternoon, wearing a textured denim overshirt over a plain T-shirt. Add wooden record shelves, warm window light, realistic skin and fabric textures, subtle film grain, and editorial lifestyle photography.
Other useful locations include workshops, metro stations, bookstores, sports grounds, cafes, railway stations, studios, markets, and old streets.
How to Write AI Prompts for Girls
The same principle applies to female portraits.
Instead of relying on one repeated fashion concept, describe a specific environment and photographic style.
For example:
Preserve the person’s original facial identity, hairstyle, skin tone, and natural proportions. Dress her in an earthy handloom-style saree with minimal jewelry. Place her beside a heritage-style window during morning. Add soft directional sunlight, realistic saree texture, natural skin details, subtle hair strands, gentle shadows, and elegant editorial photography.
You can replace the saree with a casual outfit, kurta, dress, or any clothing that matches the intended photograph.
How to Write AI Prompts for Professional Photos
Professional portraits usually benefit from simplicity.
You don’t need a dramatic environment.
Try:
Create a professional head-and-shoulders portrait while preserving the person’s facial identity and natural expression. Dress the subject in smart-casual clothing. Use a softly textured neutral background, one large soft key light, gentle fill lighting, realistic skin texture, sharp eyes, natural shadows, and approachable professional photography.
For LinkedIn-style or business profile images, avoid overly dramatic backgrounds and heavy color effects.
The face should remain the visual focus.
How to Write AI Prompts for Travel Photos
Travel prompts should describe the environment rather than simply saying “put me in a beautiful place.”
For example:
Preserve facial identity and natural body proportions. Place the subject at a quiet mountain viewpoint shortly after sunrise. Add realistic layered mountains in the distance, soft morning mist, warm directional sunlight, simple travel clothing, natural wind movement, believable atmospheric perspective, and professional travel photography.
The environment should feel like part of the photograph rather than a digital backdrop pasted behind the subject.
Why “8K Ultra HD Masterpiece” Isn’t Enough
You’ve probably seen prompts containing phrases such as:
8K, 16K, HDR, ultra HD, masterpiece, best quality, hyper-realistic, award-winning.
These words aren’t automatically useless, but they don’t describe the most important visual problems.
Suppose an image has distorted fingers, inconsistent lighting, plastic skin, and impossible reflections.
Calling it “16K” doesn’t fix those problems.
A better prompt explains the actual qualities you want:
Natural skin texture, accurate hand anatomy, realistic fabric folds, consistent directional lighting, physically believable reflections, correct perspective, and restrained color grading.
Specific visual instructions are more meaningful than stacking resolution buzzwords.
Negative Instructions for AI Photo Editing
Sometimes it helps to mention obvious problems you want to avoid.
For realistic portraits, you might add:
Avoid plastic-looking skin, distorted hands, duplicate fingers, unnatural body proportions, asymmetrical eyes caused by generation errors, warped objects, inconsistent reflections, accidental text, extreme sharpening, excessive saturation, and unrealistic shadows.
Don’t turn the negative section into an enormous list.
Focus on the errors most relevant to your image.
Why AI Photos Sometimes Look Fake
There are several common reasons.
One is inconsistent lighting. If the face appears to be illuminated from the left but every environmental shadow suggests the light comes from the right, something feels wrong.
Another is texture.
AI can sometimes make skin, clothing, walls, and furniture excessively smooth.
Reflections can also cause problems. Mirrors, windows, water, and polished surfaces need to respond logically to the surrounding environment.
Anatomy is another area worth checking, particularly hands and small background figures.
A realistic prompt can’t eliminate every possible generation error, but clear instructions can give the model a more coherent target.
Common AI Photo Editing Prompt Mistakes
One of the biggest mistakes is trying to put everything into a single image.
For example:
Luxury hotel, snowy mountain, tropical beach, neon street, heavy rain, sunset, moonlight, sports car and cinematic studio lighting.
That’s several completely different photographs competing with one another.
Choose one scene.
Another mistake is writing only adjectives:
Amazing, beautiful, viral, stylish, cinematic, premium, perfect.
These words don’t explain what the photograph actually looks like.
Replace vague adjectives with visible details.
How Long Should an AI Photo Editing Prompt Be?
There is no perfect word count.
A useful prompt should be long enough to describe the important visual details but short enough to remain coherent.
A simple studio headshot might only require a few sentences.
A complicated environmental portrait may need more detail because you’re controlling the subject, clothing, architecture, weather, lighting, reflections, and composition.
Don’t make a prompt longer simply because you think AI prefers long prompts.
Every instruction should have a reason to be there.
How to Improve an AI Photo Without Rewriting the Entire Prompt
Suppose the first result is almost perfect, but the lighting is too dramatic.
You don’t necessarily need a completely new prompt.
Tell the AI what specifically needs adjusting:
Keep the existing composition, facial identity, clothing, and background. Reduce the lighting contrast, soften the facial shadows, and make the overall daylight more natural.
The same approach works for clothing, backgrounds, color grading, or framing.
Change the problem instead of starting over.
AI Photo Editing Prompt Examples You Can Customize
Here are a few short templates you can adapt.
Natural Portrait
Preserve facial identity and natural proportions. Place the subject beside a large window during morning. Add soft daylight, simple clothing, realistic skin and hair texture, gentle shadows, and natural portrait photography.
Instagram Portrait
Preserve facial identity and create a candid portrait outside a neighborhood cafe. Add warm morning sunlight, relaxed clothing, realistic street details, subtle background depth, and lifestyle photography.
Cinematic Portrait
Preserve facial identity and place the subject beside a rain-covered window during evening. Add realistic reflections, warm interior lighting, cool ambient light outside, subtle film grain, and cinematic photography.
Professional Portrait
Preserve facial identity and natural expression. Create a centered head-and-shoulders portrait with smart-casual clothing, a neutral background, soft studio lighting, sharp eyes, realistic skin texture, and professional photography.
Traditional Portrait
Preserve facial identity and natural proportions. Dress the subject in an elegant traditional outfit with realistic fabric texture and subtle accessories. Add a heritage-style environment, warm natural daylight, believable shadows, and editorial portrait photography.
Frequently Asked Questions About AI Photo Editing Prompts
How do I write a good AI photo editing prompt?
Describe what should remain unchanged, then specify the location, clothing, lighting, textures, composition, and photography style you want.
How can I make AI-edited photos look realistic?
Use realistic lighting, natural skin texture, accurate body proportions, detailed fabric, believable shadows, correct reflections, and a coherent environment.
How can I keep my face the same?
Start with a clear source photo and explicitly ask the image tool to preserve facial identity, facial structure, hairstyle, skin tone, eye color, expression, and natural proportions. Exact results vary by tool.
Do I need to add 8K to every AI prompt?
No. Resolution terminology alone doesn’t fix anatomy, lighting, textures, or composition. Specific photographic instructions are generally more useful.
What is the best AI photo editing prompt formula?
A useful starting formula is: Identity + Location + Outfit + Lighting + Texture + Composition + Photography Style.
Should AI photo editing prompts be long?
Not necessarily. They should be detailed enough to explain your intended result without including unnecessary or contradictory instructions.
Why does AI change my face?
Image models can reinterpret facial details during editing, particularly when the transformation is significant or the source image isn’t clear. Explicit identity-preservation instructions can communicate your intention, although results depend on the model.
What should I avoid in an AI photo prompt?
Avoid conflicting environments, contradictory lighting, excessive quality buzzwords, unrealistic anatomy requests, and too many unrelated styles in one prompt.
Final Words
Learning how to write AI photo editing prompts is more useful than collecting thousands of prompts without understanding how they work.
Once you understand the basic structure, you can create your own prompts for almost any concept.
Start with what should remain unchanged. Choose one clear location. Describe the outfit if necessary. Decide where the light comes from. Add realistic textures. Select the composition and finish with an appropriate photography style.
Most importantly, don’t rely on words such as “viral,” “8K,” or “masterpiece” to do all the work.
A well-described photograph gives an AI image tool a much clearer target—and gives you far more control over the result.






